How to Create an Employee Profile in the OpenHRMS Employees Module
OpenHRMS software is one of the best HR management software, and it can help you to centralize each operation of a company most exclusively. The platform consists of separate modules to manage each process of a company. The important modules included in the system are Employee, Employee Recruitment, Payroll, Appraisal, Referral, Attendance, Time Off, Expenses, Loan Management, and many more. The Employees module available in the system is a dynamic platform that will simplify all the hurdles associated with employee management. This module will provide you with insight into creating and managing your employee profiles.
Here in this blog, we can discuss the creation steps of a new Employee profile in the OpenHRMS Employees module.
To create a new employee profile details, click on the Create button. Now you will depict a new window where you can view an employee creation form
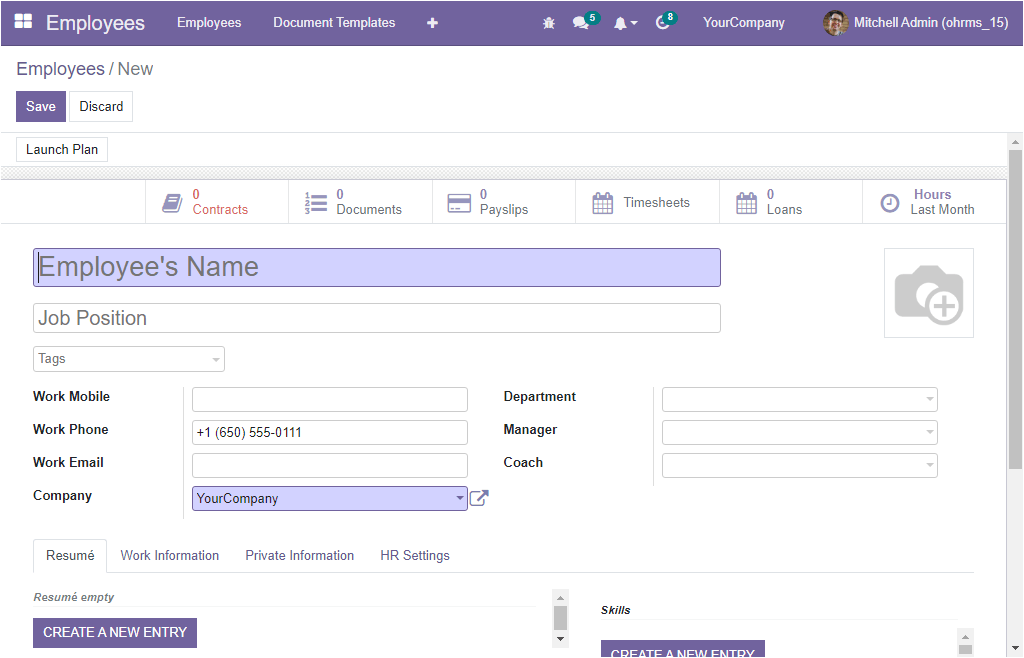
Here in the creation form, you can describe the Employee’s name in the allotted space. Then you can mention the Job Position of the employee. After that, you can define some tags to identify the employee data quickly. It is also possible to upload employee photographs in the specified area.
In addition, you can provide work-related contact information such as Work Mobile, Work Phone, and Work Email in the allowed space. By default, the name of the company will be listed in the Company field. If the platform works with multiple company bases, you can select the corresponding company using the dropdown menu. Also, you can mention the employee's department and the name of the employee's Manager and the Coach.
To add the additional details of the employee, the widow offers you various tabs named Resume, Work Information, Private Information, and HR Settings.
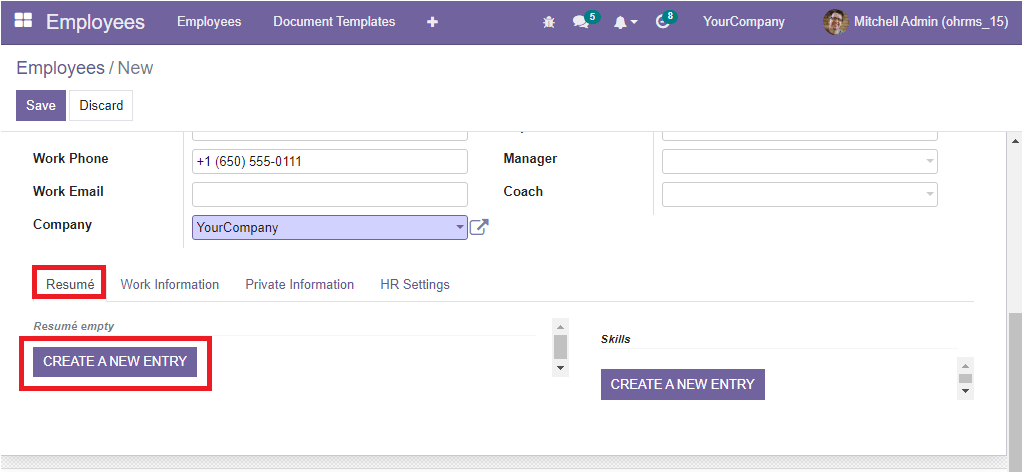
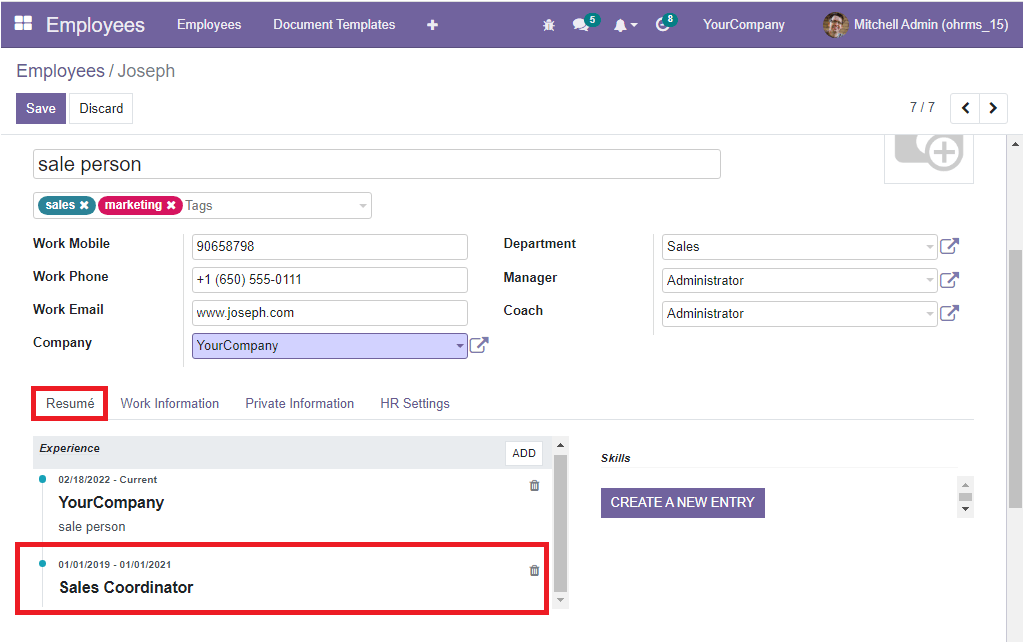
Under the Resume tab, you can add the education qualifications, skills, and experiences of the employee. If you click on the Resume tab, you will depict the options for adding the resumes and skills of the employee. Including this information will enrich the employee profile, and it will be very useful to understand the employee's abilities.
To add Resume lines, click on the CREATE A NEW ENTRY button highlighted in the image below.
Suppose you save the employee details that we provided earlier. In that case, the system will automatically generate some experiences based on the information you gave in the window, just like the image below.
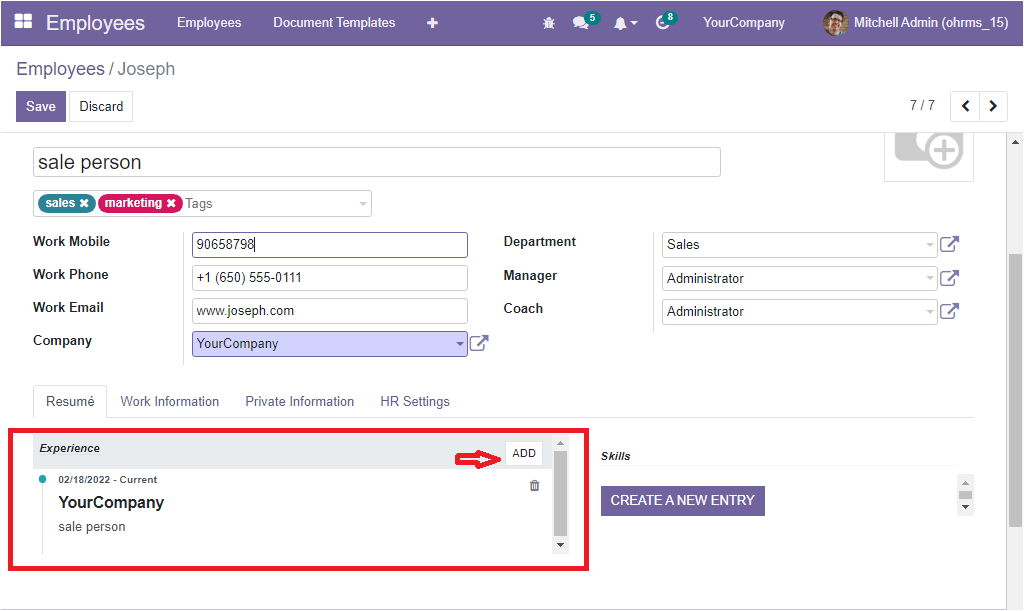
Here you can see the system generated the employee's experiences with the company name, job position, and the date that we mentioned earlier. If you want to add more experiences or other resume lines, click on the ADD button pointed with an arrow mark in the above image. In other cases, If the details are not saved, click on the CREATE A NEW ENTRY button. As you click on the button, a new pop up will appear, as shown below.
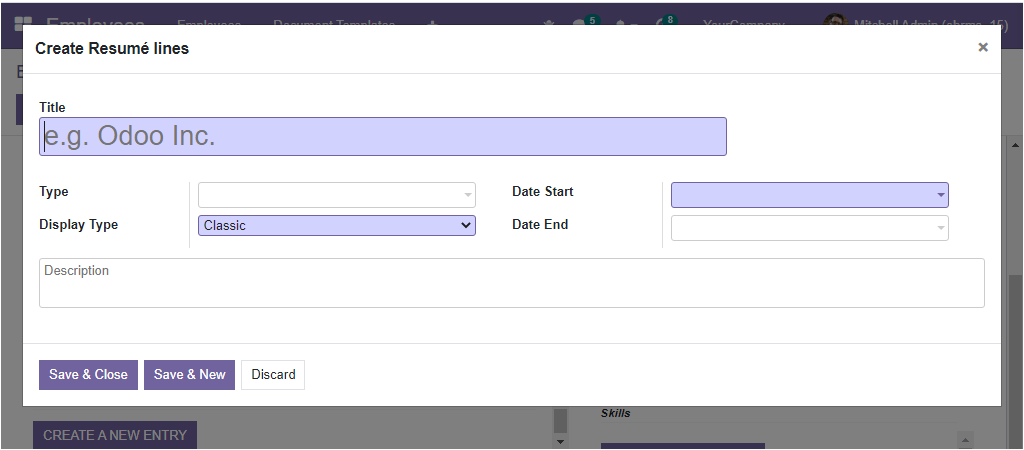
Using this window, you can configure various resume lines such as educational qualification, experience details, certifications, training and many more aspects. So in the creation form, you can include the title of the resume. Then you can select the Type using the dropdown menu. It can be experience, education, internal certification, training or others. The OpenHRMS platform allows you to configure the type separately under the configuration tab. All the types configured will be listed here in the dropdown menu. If the type is not an already mentioned one, it can be created directly from here itself by clicking on the External Link option.

Similarly, you can mention the Display Type. Then you can define the Starting period in the Date Start field and the completed date in the Date End field. For example, suppose you want to create experience details of the employee as a sales coordinator. In that case, you can mention the resume title as a Sales Coordinator, the type can be said as Experience, and the time period of this employee working as a sales coordinator in the Date Start and Date End field. The window also asks you to provide a short description of the resume line. After providing all the details mentioned above, click on the Save button to save the details. Now the newly created experience will be displayed under the Resume tab.
Likewise, you can add more and more resume lines based on the education qualification, training programs, certifications and many more.
The same method can be followed to add your employees' skills under the Resume tab. Click on the CREATE A NEW ENTRY button available under the Skills option.
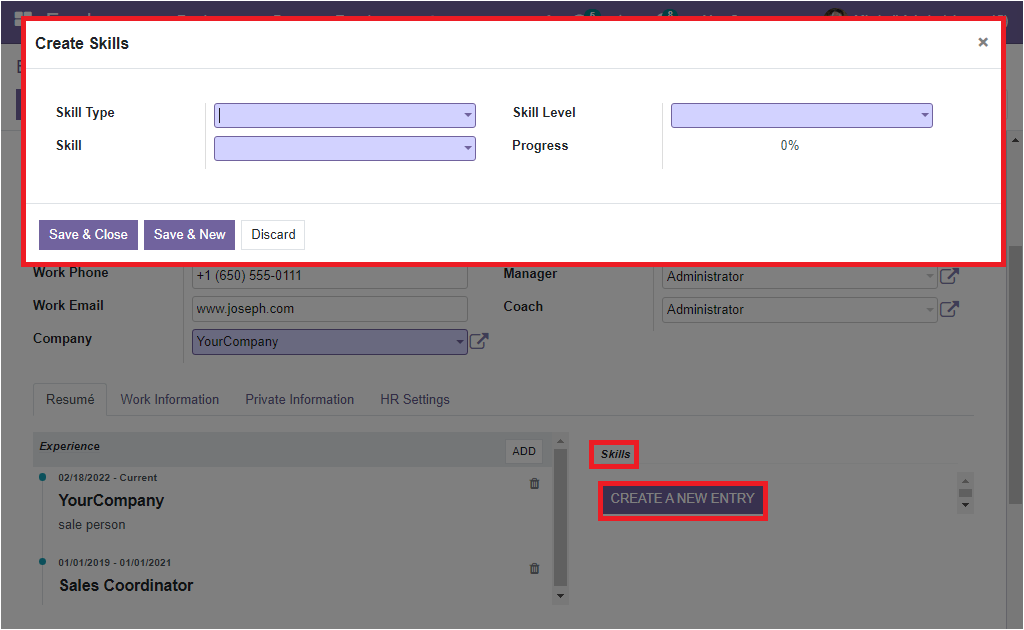
Now you will depict a pop-up window for creating skills, as shown in the above picture. With the help of the window, you can include any skills in your employee profile. So initially, you can specify the Skill Type in the specified field with the help of the dropdown menu. You can create any skill type. For example, if the employee can speak different languages, can create language as a skill type. Or, if they have an interest in sports or other co-curricular activities, it can also be configured. After specifying the skill type, you can mention the Skill, and the skill level in the specified field along with its progress. Once you provide all the details, save the details. Now the created skill will be displayed in the Skills section.
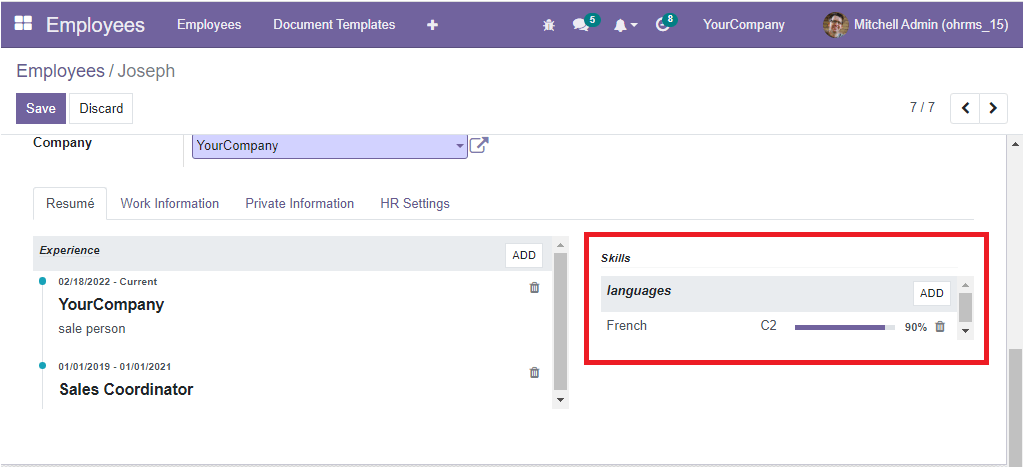
If you want to add more skills, click the ADD button available under the skills section. The system provides you with the provision to change the progress level of the skill based on the improvements made by the employee. All these skills of the employee can be recorded, and the HR person can view and categorize the employees based on their skills and abilities. Also, they can promote the employee for other suitable positions.
Now let us move on to the Work Information tab. In this tab, you can include work-related information. So under the Locations session, you can include the Work Address and Work Location. If you already mentioned the company's name where he is working, the work address field will be filled by default. Then in the Approvers session, you have time off and Expense fields. Here you can select the user responsible for approving time off of this employee. And in the Expense field, mention the user responsible for the expenses of this employee. If you are not selecting the responsible person, the approval is done by an administrator or approver which is described in the settings. Now come to the Schedule section, here you can specify the Working Hours and Timezone of the employee.
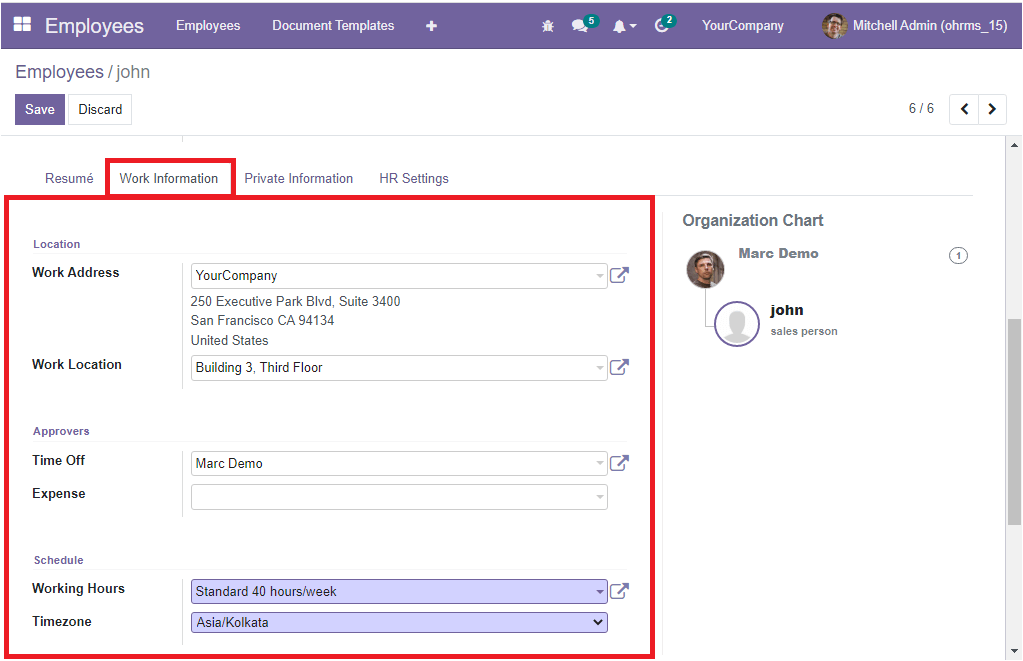
If the manager or coach responsible for this particular employee is specified in the employee profile and saved the information, the right side of the display will show an organization chart as shown in the image below. This hierarchy will be very useful for identifying the responsible person associated with the employee.

In the Private Information tab, you can provide the private details of the employee. You can enter the employee's private address, Private Email ID, and Phone number. Then you can select the language preferred by the employee in the Language field so that all the emails and documents sent to this contact will be translated in this language. Furthermore, the Home -Work distance in kilometers can be specified.
Similarly, you can enter the Passport Number in the prescribed area, and the Identification Number also can be given. To provide the Citizenship details, you can mention the Nationality (country) of the employee along with the details such as Gender, Date of Birth, Place of Birth, and Country of Birth.
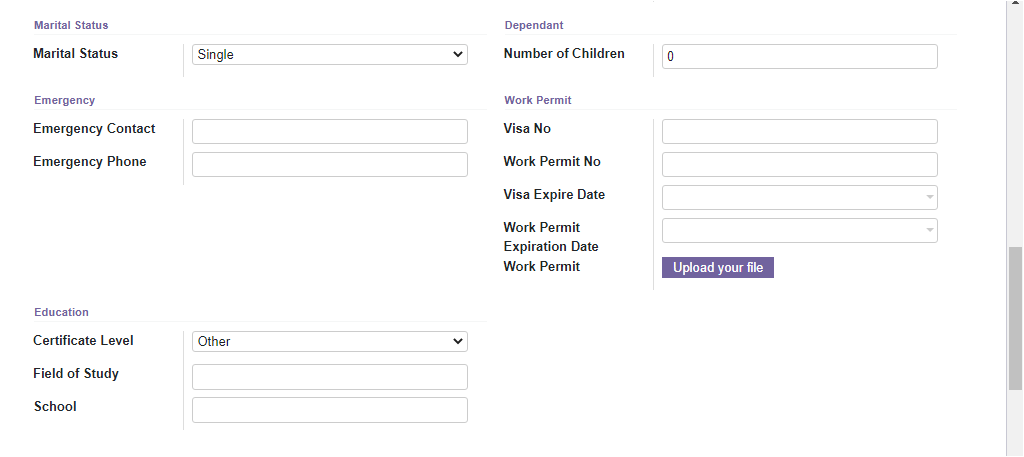
Next, you may provide the employee's Marital status, and in the Dependent field, you can also mention the Number of Children. It will be advantageous if you provide the Emergency Contact details and the Emergency Phone number in the allotted space.

Additionally, the Work Permit details such as Visa Number, Work Permit Number, Visa Expire Date, and Work Permit Expiration Date can be given under the Work Permit section. Here, you are also required to upload the employee's work permit using the upload option. Moreover, the Education section of the Private Information tab asks you to define the educational details of the employee, such as Certificate Level, Field of Study, and School.
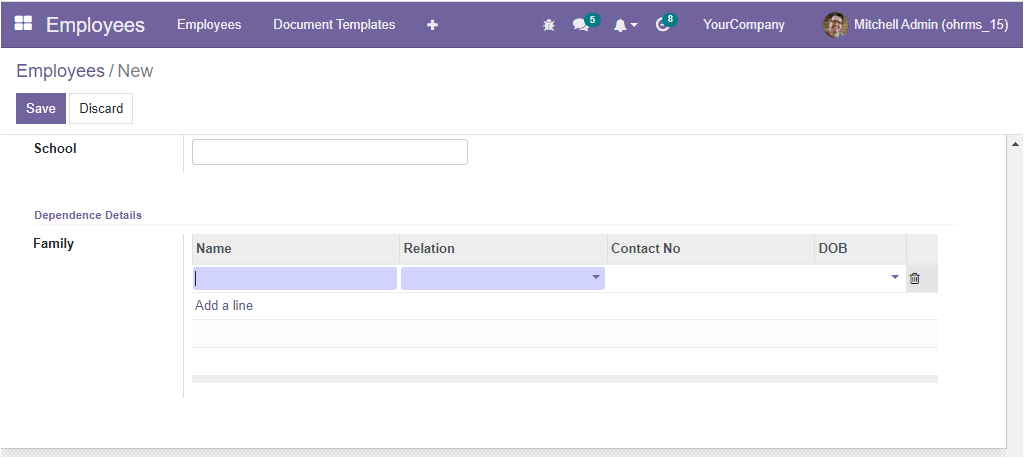
Under the Dependance Details tab, you can give the family information using the Add a line option. You can mention the name of the family members, relation, contact number and date of birth.
When you come to the HR Settings tab of the employee profile, you can view various options, as shown in the picture below.
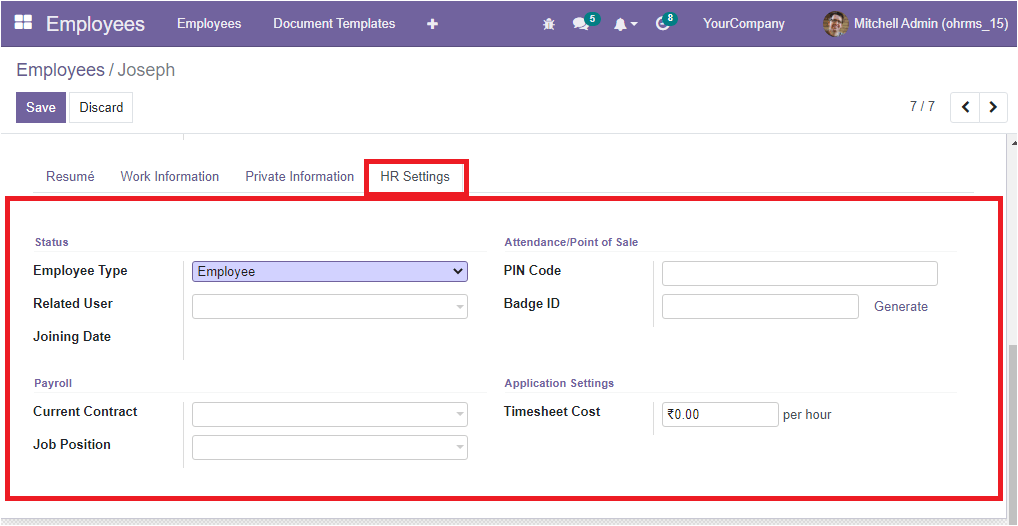
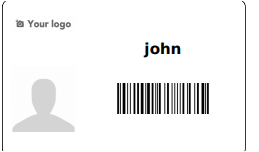
Here you can define the Employee Type using the dropdown menu. Then in the Related User field, the related user name for the employee can be selected. The employee joining date computed from the contract start date can be included in the Joining Date field. Under the Payroll section, the current contract details of the employee and the Job Position can be given. Similarly, the details required for the Attendance and Point Of Sale module, such as PIN Code, Badge ID can be defined. This defined PIN Code is used to check in or check out from the Kiosk mode of the Attendance application. And also for changing the cashier in the Point of Sale application. The Badge ID field allows you to generate a badge id for the employee for identification purposes. To create the badge id, click on the Generate button. Now the system will automatically generate the Badge ID.
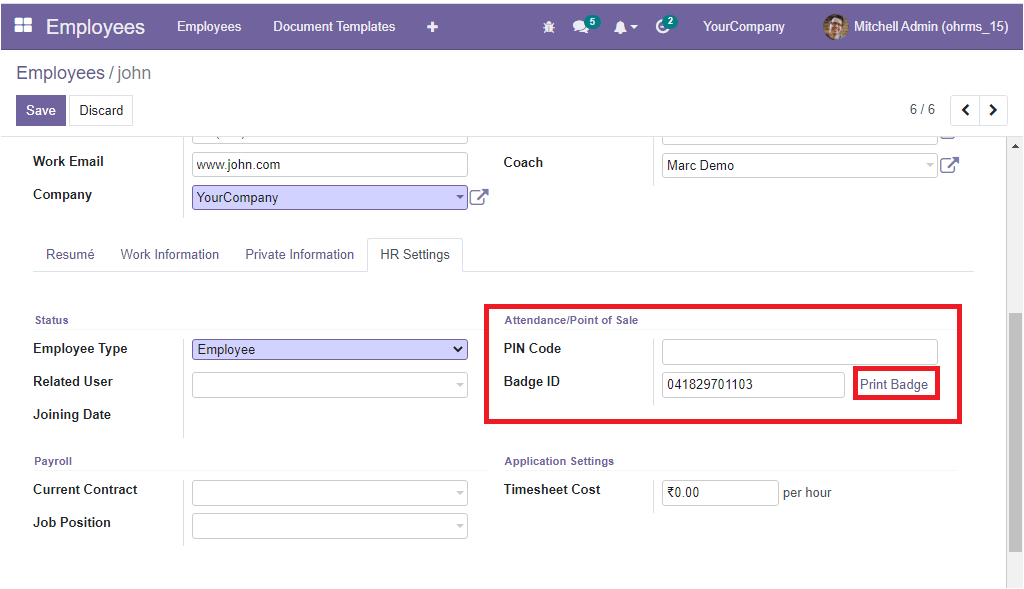
To print the badge id, click on the Print Badge button, which will be visible at the same position where the Generate button is displayed.
Finally, the Timesheet Cost per hour can be calculated under the Application Settings session. Once you completed all these steps, click on the Save button, which can be accessed on the top left corner. Now the newly created employee profile will be showcased in the Employee dashboard.
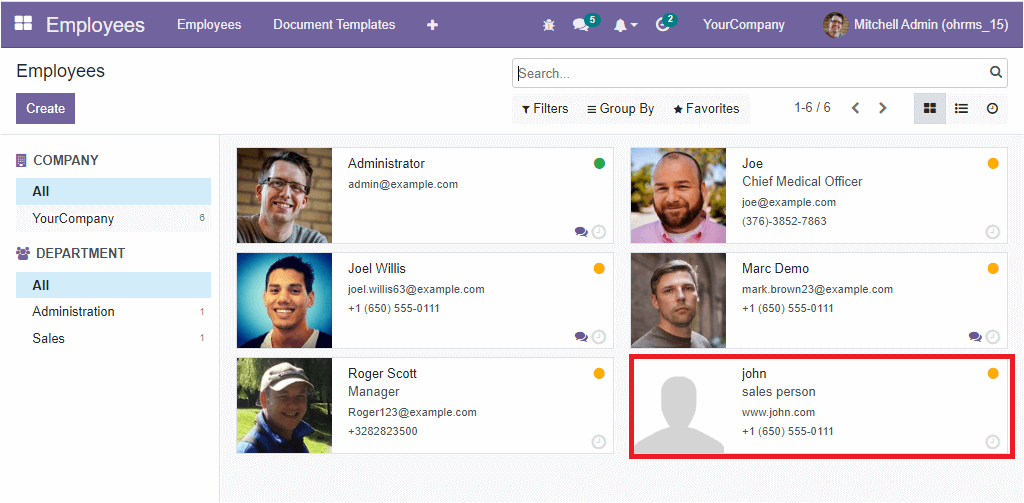
When you click on the employee profile, the window will open up with all the details you provided, along with some smart tabs visible on the top of the window, as shown in the image below.
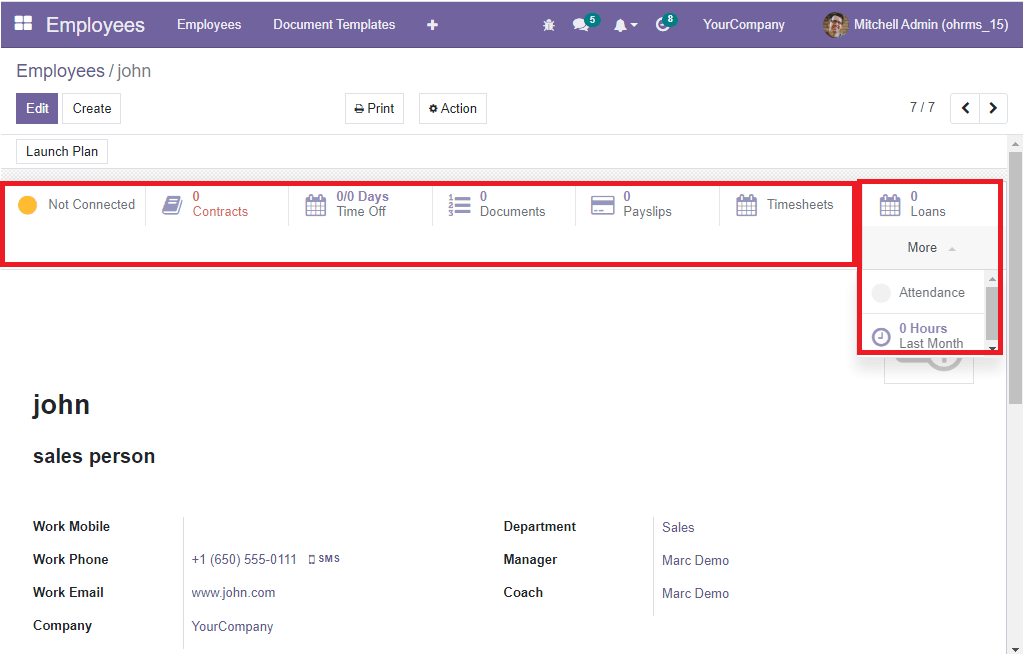
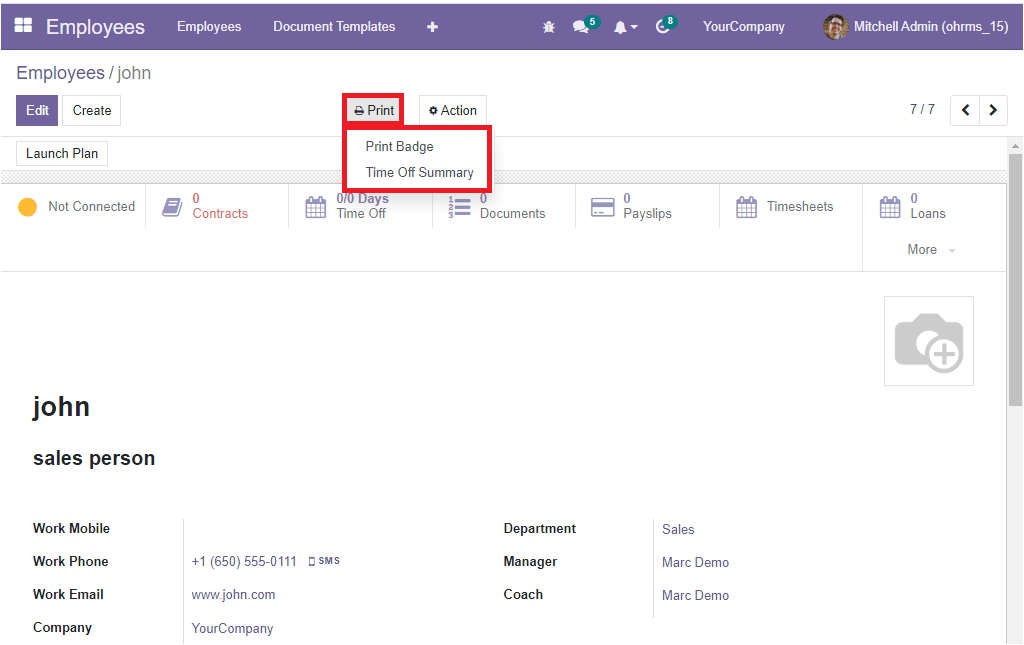
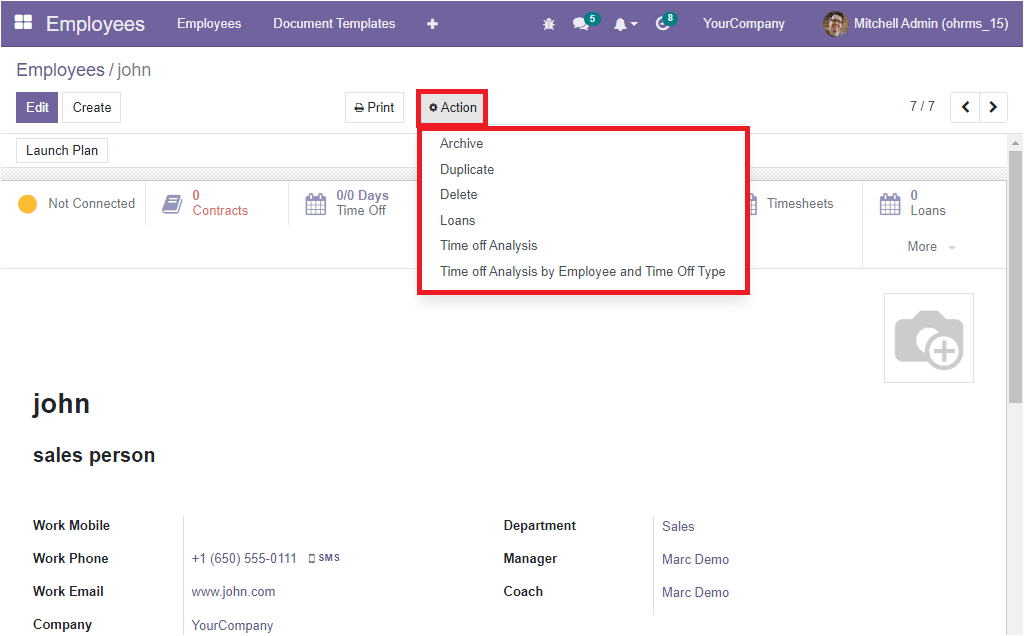
The smart buttons displayed in the Employees window are Contracts, Time Off, Documents, Payslips, Timesheets, Loans, Attendance, Worked hours last month, and a tab for displaying whether the employee is present or not. All these buttons act as the navigations to access the respective data of the employee. Moreover, you can view the Print and Action buttons on the top centre of the screen, including printing options and the additional actions, respectively. The options available under the Print button are Print Badge and Time Off Summary.
The Action button includes Archive, Duplicate, Delete, Loans, Time Off Analysis, and the Time Off Analysis by Employee and Time Off Type options.
This is all about the Employee creation form of OpenHRMS Employees module. Using this feature, you can easily create and manage employee profiles of your employees.